Battery switch on travel trailer function is crucial for managing your RV’s power. Understanding how your battery switch works is key to preventing electrical issues and maximizing your battery life. This guide covers different switch types, safe connection and disconnection procedures, troubleshooting common problems, and essential maintenance tips. We’ll break down the complexities of your travel trailer’s electrical system in a way that’s easy to understand, regardless of your experience level.
From the simple act of turning the switch on or off to understanding the intricate interplay between your batteries, converter, and other electrical components, we’ll demystify the process. We’ll also cover safety precautions to keep you and your RV safe. Get ready to become a pro at managing your travel trailer’s power!
Connecting and Disconnecting Batteries: Battery Switch On Travel Trailer Function
Connecting and disconnecting your travel trailer’s house battery correctly is crucial for safe and reliable operation. Improper connections can lead to damage to your electrical system, battery failure, and even fire hazards. This section will guide you through the process, emphasizing safety and maintenance best practices.
Connecting a house battery involves securely attaching the positive (+) and negative (-) terminals to the designated posts on your trailer’s battery system. Typically, this involves using heavy-duty battery cables with appropriate sized connectors. Always ensure a clean and tight connection to prevent voltage loss and corrosion.
Battery Connection Procedures
Before beginning any work, always disconnect the negative (-) terminal first to avoid accidental short circuits. This is a universally accepted safety precaution. Use a wrench or pliers appropriate for the size of your battery terminals, and avoid using excessive force.
- Clean the battery terminals and cable ends with a wire brush to remove any corrosion or debris. A baking soda and water paste can help neutralize acid buildup.
- Attach the positive (+) cable to the positive (+) terminal on the battery, ensuring a secure connection. Tighten the clamp firmly, but avoid over-tightening.
- Connect the negative (-) cable to the negative (-) terminal on the battery. Again, ensure a tight connection.
Maintaining Battery Connections
Regular maintenance is key to preventing corrosion and ensuring reliable battery performance. Corrosion buildup on battery terminals restricts current flow, leading to reduced performance and potential damage.
So, you’re prepping for your awesome travel trailer adventure? First things first: understand your power! Check out this guide on the battery switch on travel trailer function to avoid any dead-battery surprises. Knowing how to manage your power is key, and once that’s sorted, don’t forget to secure your trip with solid travel insurance. Getting Aon travel insurance beforehand gives you peace of mind, letting you focus on the fun stuff!
- Regularly inspect your battery terminals for signs of corrosion (white, green, or blue deposits).
- Clean the terminals with a wire brush and baking soda paste as needed. Apply a corrosion inhibitor to the terminals after cleaning to help prevent future buildup.
- Consider using battery terminal protectors to help keep the terminals clean and dry.
Battery Safety Precautions
Working with batteries requires caution. Batteries contain sulfuric acid, which is corrosive and can cause burns. Always wear appropriate safety gear.
So, you’re prepping for your awesome travel trailer adventure? First things first: understand your battery switch on travel trailer function – it’s crucial for keeping your lights and appliances running. Once you’ve got that sorted, think about insurance. Getting Aon travel insurance is a smart move for peace of mind, covering unexpected hiccups along the way.
This way, you can focus on enjoying the open road, knowing you’re covered.
- Wear safety glasses to protect your eyes from splashes.
- Wear gloves to protect your hands from acid and corrosion.
- Work in a well-ventilated area to avoid inhaling battery fumes.
- Never short-circuit the battery terminals by accidentally connecting the positive (+) and negative (-) terminals directly. This can cause sparks, heat, and potentially an explosion.
- Keep batteries away from open flames and sources of ignition.
Disconnecting Batteries Before Maintenance or Storage, Battery switch on travel trailer function
Properly disconnecting your batteries before maintenance or long-term storage is essential to prevent accidental short circuits and ensure safety.
- Turn off all power to the trailer’s electrical system.
- Loosen the negative (-) cable clamp first.
- Remove the negative (-) cable from the battery terminal.
- Loosen and remove the positive (+) cable from the battery terminal.
- Clean the battery terminals and cable ends.
- Apply a corrosion inhibitor (if using).
- Store the batteries in a cool, dry place, if not immediately reconnecting.
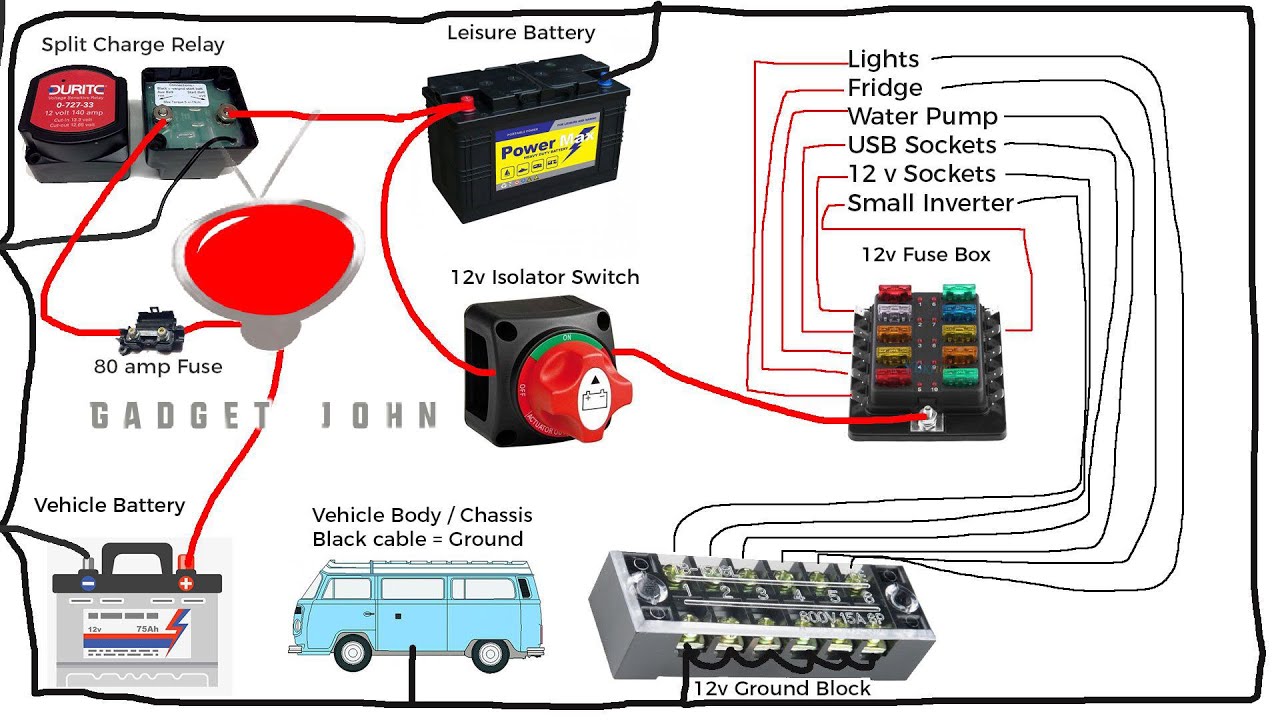
Battery Switch and Electrical System Integration

Your travel trailer’s battery switch is the central control point for your 12-volt DC power system. Understanding how it interacts with other components is crucial for safe and efficient power management. This section details the switch’s role in coordinating power flow between your batteries, converter, inverter, and solar panels.
The battery switch acts as a gatekeeper, directing power from your batteries to the rest of your trailer’s electrical system. It’s not just a simple on/off switch; it typically offers multiple positions to control which battery bank (or both) powers the system, providing flexibility and safety.
Power Distribution with the Battery Switch in Different Positions
The battery switch’s position directly impacts how power flows through your trailer. Let’s examine each position:
- Position 1: In this position, only the battery bank connected to terminal 1 is supplying power to the trailer’s 12V system. The second battery bank (if present) is completely isolated.
- Position 2: This position mirrors Position 1, but now only the battery bank connected to terminal 2 powers the system. Again, the other bank is isolated.
- Both: Selecting “Both” connects both battery banks in parallel, effectively doubling the available power capacity for your 12V systems. This is ideal for high-power demands, such as running an air conditioner or multiple appliances simultaneously.
- Off: This position completely disconnects both battery banks from the trailer’s electrical system, preventing accidental drain and ensuring safety.
Interaction with Other Electrical Components
The battery switch’s influence extends to several key components:
The converter, which transforms 12V DC power from your batteries into 120V AC power for your household appliances, receives its DC input from the battery switch. Similarly, the inverter, which converts 12V DC to 120V AC for specific devices, also draws its power from the battery switch. Solar panels charge your batteries, but the battery switch controls how that stored energy is used within the trailer.
Electrical System Diagram
Mastering your travel trailer’s battery switch is about more than just turning it on and off; it’s about understanding how your RV’s electrical system works and how to maintain it. By following the guidelines in this guide, you’ll be equipped to handle any battery-related issue with confidence, ensuring smooth and reliable power for all your adventures. Remember, regular maintenance and safe practices are essential for a long-lasting and efficient electrical system. Happy travels!
Frequently Asked Questions
What happens if I leave my battery switch on all the time?
Leaving your battery switch on constantly can drain your batteries, especially if you have parasitic draws (small electrical loads even when the trailer isn’t in use). It’s best to turn it off when not using the trailer for extended periods.
How do I know which type of battery switch I have?
Check the switch itself for markings indicating its function (e.g., 1-2-both-off). If you’re unsure, consult your travel trailer’s manual or take a picture to show an RV technician.
My battery switch is making a clicking noise. What’s wrong?
A clicking noise often indicates a faulty switch or a problem with the battery connections. Check for loose wires or corrosion. If the problem persists, replace the switch.
Can I use any type of battery switch as a replacement?
No, you should use a replacement switch with the same amperage rating as your original switch. Using an incorrectly rated switch can damage your electrical system.
